September 11, 2020
DIY hallway built-in shelves
The shelves in this guide are built for our own hallway, but it's easy to adjust the measurements to suit your own home. We've also built shelves in our bathroom and kitchen on the same principle. See more pictures below.
Materials and tools to build the shelves
- 19 mm MDF board (1220x2440 mm)
(to make things easier for yourself, you can get your boards sawn 29 cm (width) on the long side (2440 mm) at a sawmill) - 45x90 mm lath
- Sand filler
- Wood glue
- 30 mm flat head screws
- 60 mm flat head screws
- 4 long door frame screws
- 8 metal angle brackets
- Primer
- Paint
(we mixed our own colour, which Silvan has recreated - it's called NCS S 4010-Y50R) - Screwdriver
- Flat heads/Philips
- Hand spachtel
- Sandpaper
- Paintbrush and roller
How to build your own built-in shelves

(Sketch of our hallway entrance)
- Start the process by measuring and planing how you're going to do this. In order to decide on the number of shelves, placement, and overall expression, it's a good idea to draw a sketch. See the pictures above for inspiration - Ida made this graphic design above :-)
- Saw the gables and shelves in suitable lengths. There's 237 cm from floor to ceiling in our hallway, so with the MDF boards of 244 cm, there was some left. SAVE THE LEFTOVER PIECES from the shelves. You can use them to saw 1,9 cm wide pieces in the same measurements as the thickness of the boards. This'll give you nice, square mount pieces!
- Screw the two gables in the end into the walls with 60 mm screws. Remember to pre drill your holes and use flat heads so that all the screws won't show afterwards.
- Use 8 metal angle brackets to put up the two middle gables in order to ensure the same distance between all vertical pieces. Make sure you place the brackets, so that they won't show under and over the shelves (see the red ring on the photo below). You can also use montage glue instead of gables.
- Pre drill two holes and use the flat heads to make deepenings in all of the carrying mount pieces.
- Measure where you want the mount pieces to be and fasten them with wood glue and 2x30 mm screws (see the arrows in the picture below).
- Put the shelves on top of the carrying mount pieces and screw from above and down into the piece as well as the opposite side of the vertical gables. Remember wood glue.
- If you make a shelf for seating, we recommend strengthening it with 45x90 mm laths screwed into the wall with door frame screws and through the vertical gables with 60 mm screws.
- Once all of the screws are in, you need to fill the holes with sand filler. Normally, you need to fill, dry, and polish with sandpaper 2 times, because the filler sinks in when they're drying (try giving the parts, where the shelves and supporting pieces of wood meet, some filler too - it makes it look more even).
- Polish all corners and edges with sandpaper, before painting the whole thing with primer and paint afterwards.


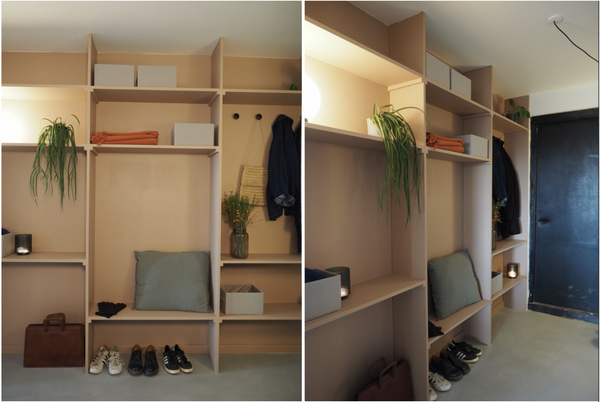
(the final result in our hallway)

 (our DIY kitchen shelves)
1 comment
Hvordan har I lavet af slutningerne ved gulvet og ved fodlisterne? Syntes det er så fedt det i har lavet 👍
Stina Jespersen
November 19, 2020